WordPress is a free Open Source project started in 2003 that has grown into the most widely used CMS (Content Management System) for the web. “WordPress started as just a blogging system, but has evolved to be used as full content management system and so much more…”*
It is used by bloggers, news and magazine sites, Fortune 500 companies, and by a number of universities for ePortfolios. A sample of who uses WordPress can be seen in their show case.
Logging into WordPress for the First Time
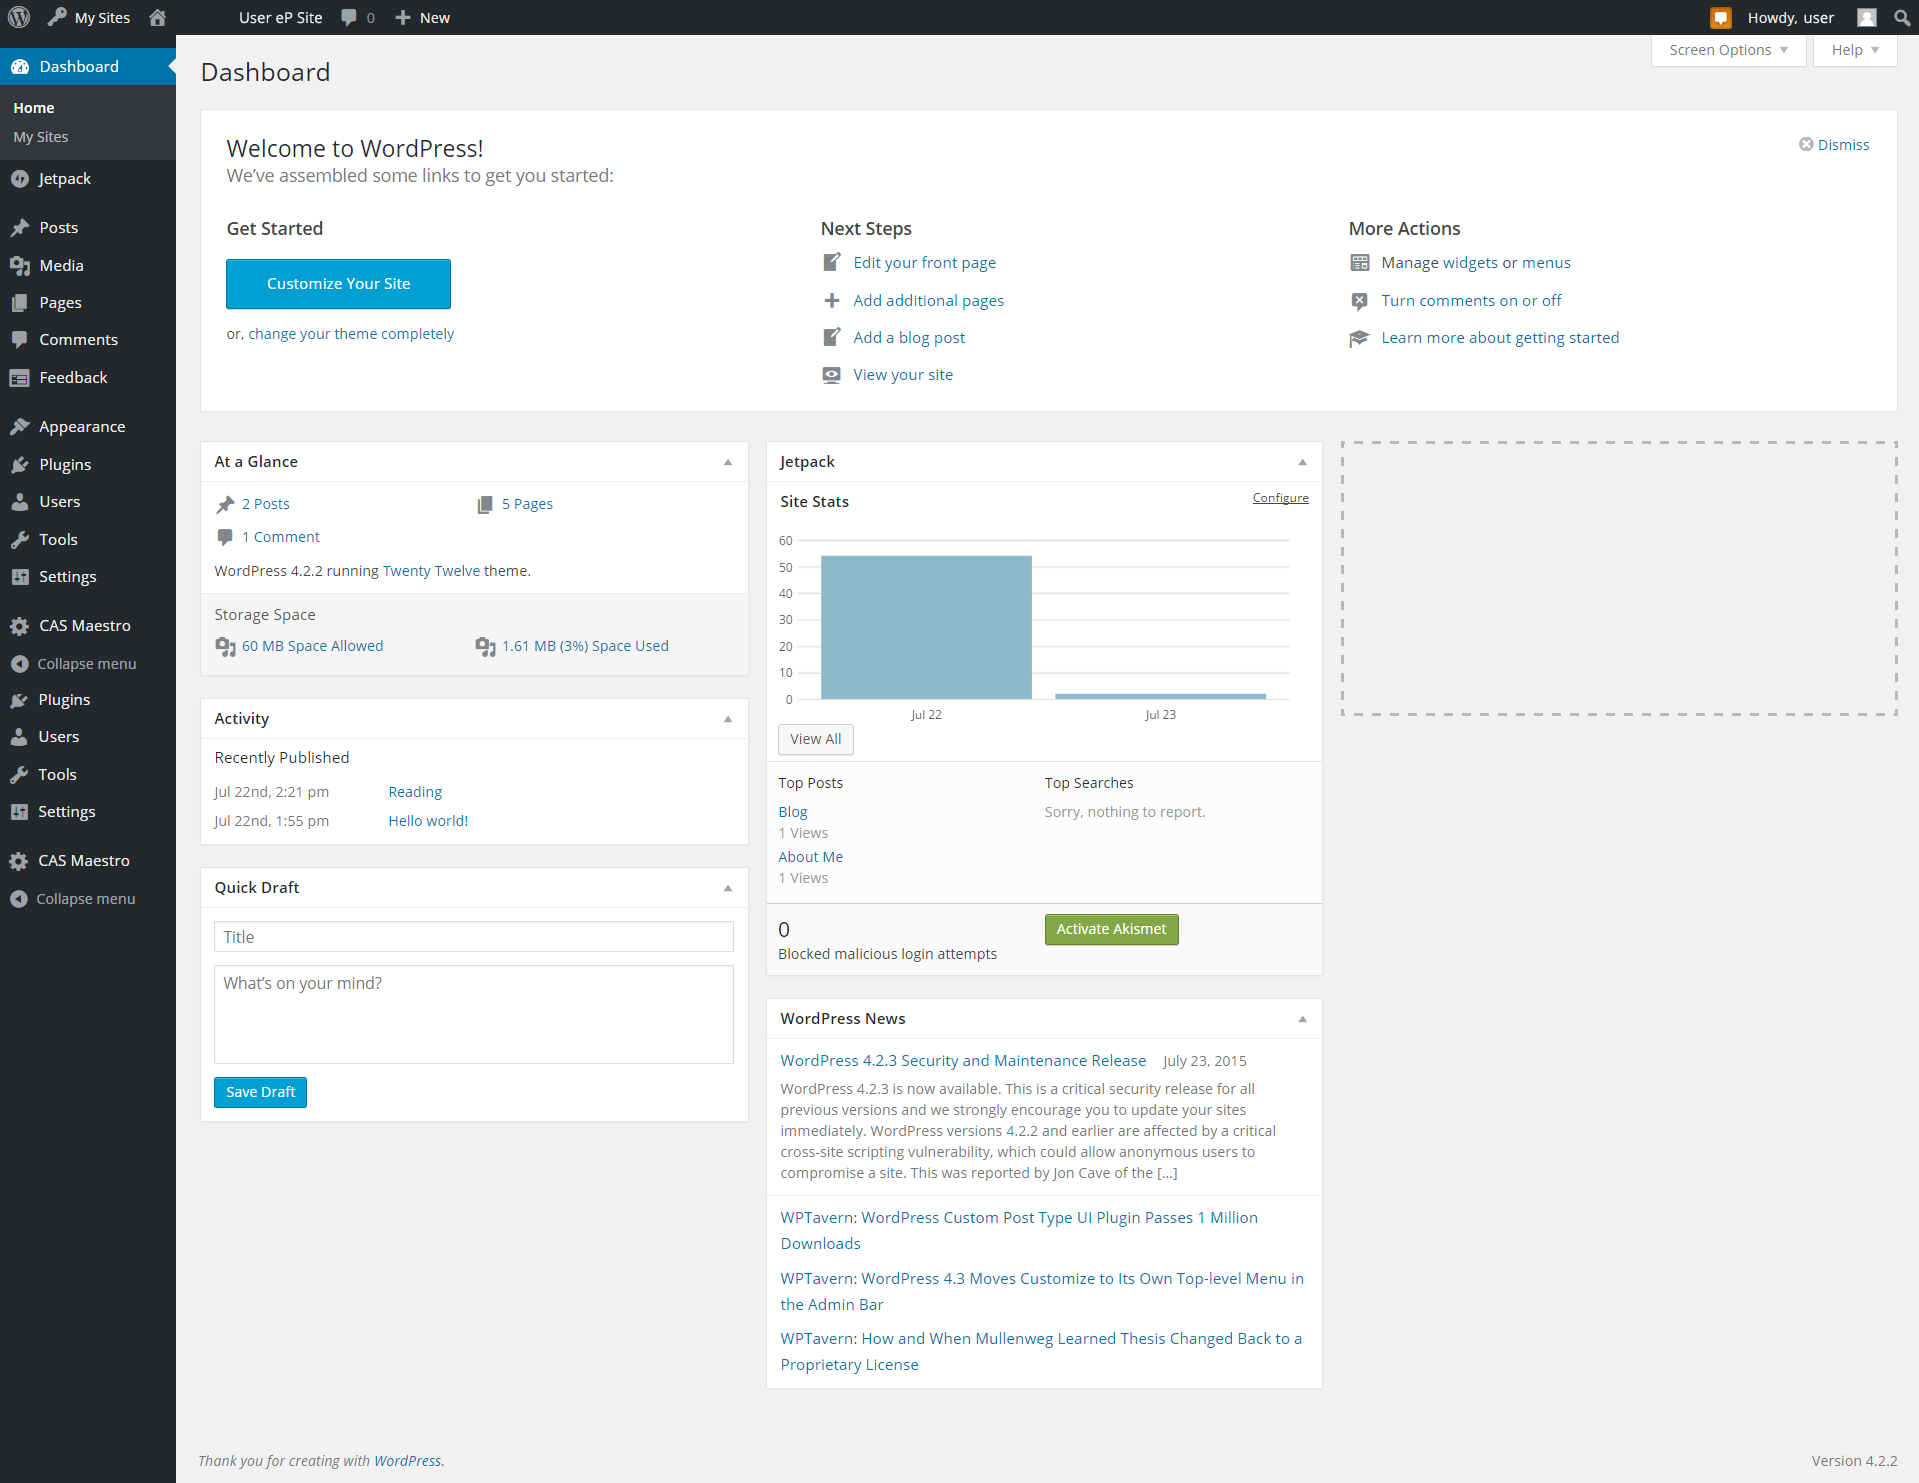
You will login to the administration section of WordPress to create your eP (ePortfolio) from this URL: eportfolio.mun.ca/USERNAME/wp-admin. When you login you will see a screen similar to the one shown below:
WordPress Dashboard
“The Administration Screen provides access to the control features of your WordPress installation. Each Administration Screen is presented in sections, the toolbar (and header), the main navigation, the work area, and the footer.
The Toolbar has links to various administration functions, and is displayed at the top of each Administration Screen. Many Toolbar items expand (flyout) when hovered over to display more information.
On the left side of the screen is the main navigation menu detailing each of the administrative functions you can perform. At the bottom of that section is a Collapse menu button that shrinks the menu into a set of icons, or to expands to list them by major function. Within each major function, such as Posts, the sub-menu expands (fly-out) when hovered over, and expands fully if an item clicked.
The large area in the middle of the screen is the work area. It is here the specific information relating to a particular navigation choice, such as adding a new post, is presented and collected.
Finally, in the footer, at the bottom of each Administration Screen in light shading, are links to WordPress, thanking you for using it, and the version of WordPress you have installed is shown.”*
Note: All content you create is locked by default. No one will be able to view your ePortfolio until you setup permissions. For more information, read the Sharing and Security section of this guide.
Before we show how to create your eP, you need to know the difference between Posts and Pages.
Posts
“Posts are the principal element (or content) of a blog. The Posts are the writings, compositions, discussions, discourses, musings, and, yes, the rantings, of a blog owner and contributors. Posts, in most cases, are the reason a blog exists; without Posts, there is no blog!”*
Posts can be listed in reverse chronological order and can be tagged, categorized and even archived in your ePortfolio. Posts can be viewed as the timely news/reflections section of your ePortfolio. As such, they are dynamic and often updated and added.
Pages
Pages are for static content. A typical ePortfolio may contain pages for things such as:
About Me
Resume
Conference Presentations
Education
Learning Philosophy
Awards
Projects
Published Works/Papers
Presentations
etc.
Create whatever sections are relevant for your eP. Pages are not a part of the chronological list of blog posts. Pages are displayed individually, or as a part of a category/tag, and are typically linked from your site menu.
Adding Pages
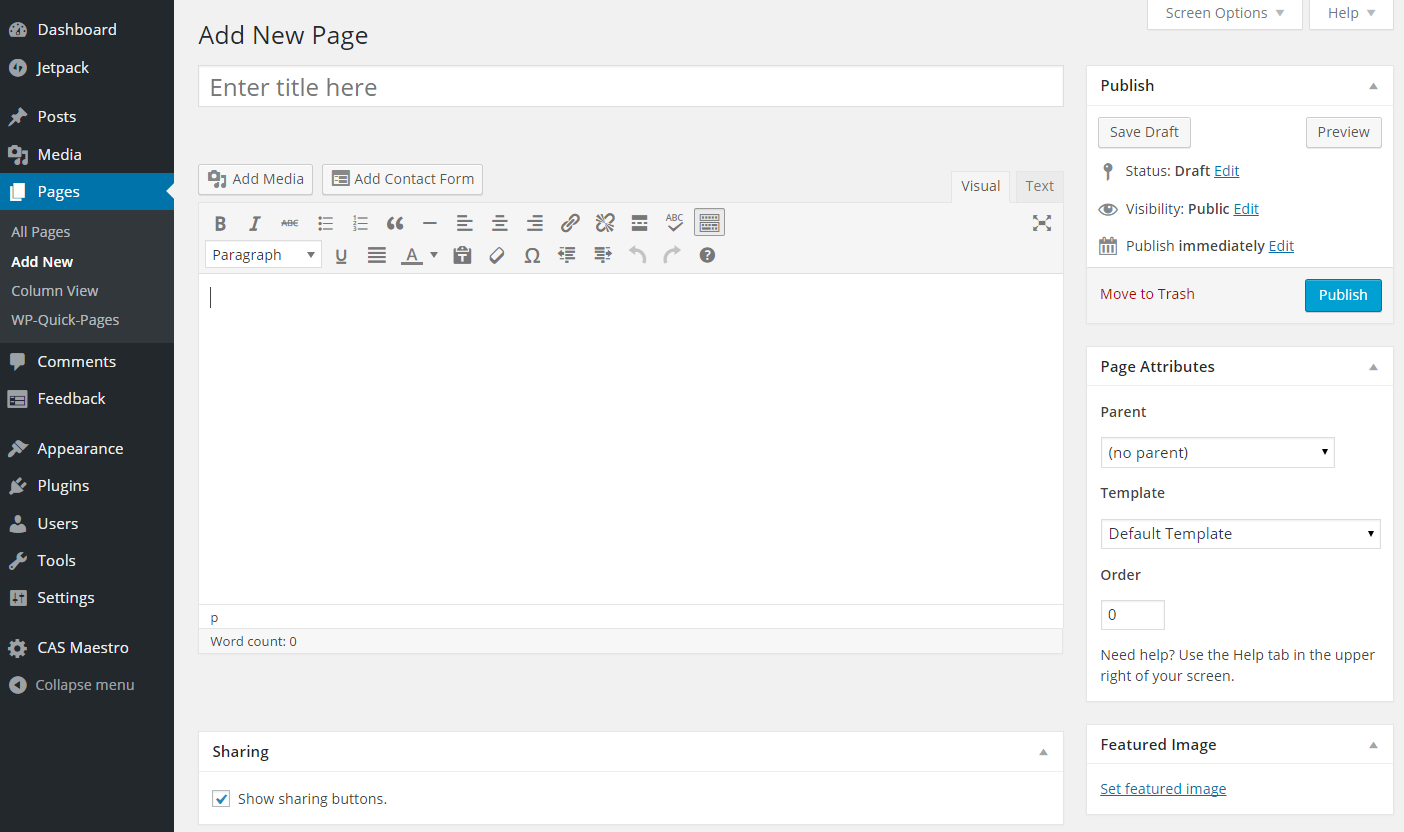
When you are logged in, to add a page select Pages then Add New. You will then see this screen:
Add new page
Title: Select where it says “Enter title here” to set the title of your page. For the title, use any words or phrases. Avoid using the same title twice as that may cause problems. You can use commas, apostrophes, quotes, hyphens/dashes, and other typical symbols in the page. WordPress cleans up the title for the link to the page.
Page Editing Area: The large blank box is where you enter your writing, links, images or links to images, and any information you want to display on your site. You can use either the Visual or the HTML view (tabs) to compose your pages.
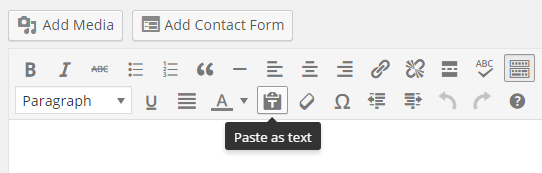
A quick note regarding formatting: Do not design the look of your eP in a program like MS-Word, and expect to copy and paste to WordPress and have it always look the same. The WordPress theme handles this for you. Use a text editor for writing content. When ready, copy the text into your Page/Post.
If you have formatting issues after pasting content in, ensure you are only pasting in text and not formatting. To do this, select the button “Paste as text” which allows you to safely paste text without carrying any of its potentially conflicting formatting:
Paste as text
If you’re having a problem, the same recommendation applies to any text copied from a webpage or other formatted source. An exception to this suggestion might be for a paper or resume which you have in a word processing program. To keep its formatting, save/print this document to a PDF, upload it to WordPress, then link to it from a page or post (we explain how that is done in a later section).
Preview button: Allows you to view the page before publishing or making changes live.
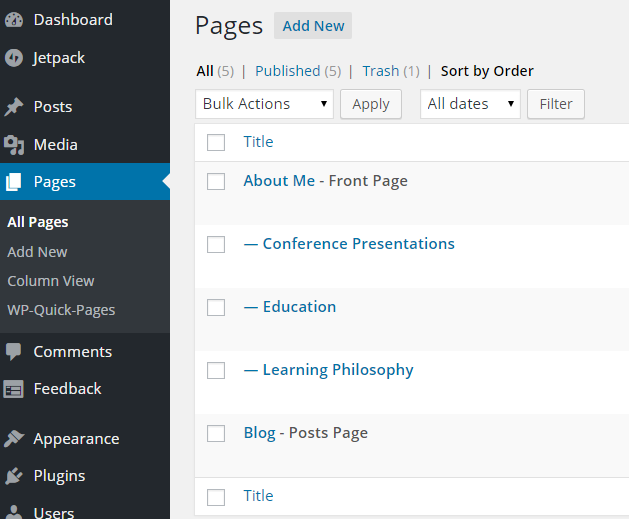
You can now go ahead and create the static pages you will require for your eP. Once you have them added you can see a list of pages under Pages / All Pages.
Page list
Create a Page for your ePortfolio Reflections
If you plan to use your ePortfolio for blogging (referred to as “Reflections” in ePortfolio terminology) AND you want to create a top level link and page for reflections, follow these steps:
Create a new blank page and call it “Reflections”, or whatever title you prefer. Keep the name short as you may like to fit it into your menu.
Next, Publish the blank page.
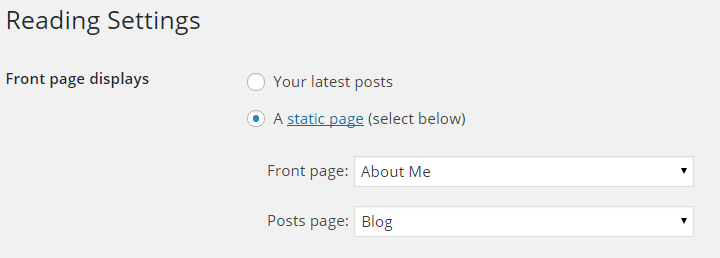
You do not add your blog posts directly to this page. WordPress automatically does that for you after you’ve pointed it to your posts/blog page in settings. Complete this step be going to Settings / Reading:
Reading Settings
Above, we’ve set the “Front page” (your site’s landing page) to a static page called “About Me” page. The “Posts Page” is set to “Blog” (this is the name of the page you created in step #1). Keep in mind: you must have these pages created before they will be listed here for you to select.
Any new page you create will show up in the above drop down lists, so you can use any page as the “Front page” for the main website landing page.
A Post (“blog” or “reflection”) – is often used to document your learning and activities allowing chronological presentation. You can also tag these posts so they can be read by tag as opposed to just chronologically. The blog section of your eP gives those interested in your development a way to easily follow your activities. Having an active blog, where you reflect upon your learning, research, and activities is an important part of an active ePortfolio.
To add a ‘Blog Post’ reflection:
From the Dashboard fly out Posts menu, select Add New.
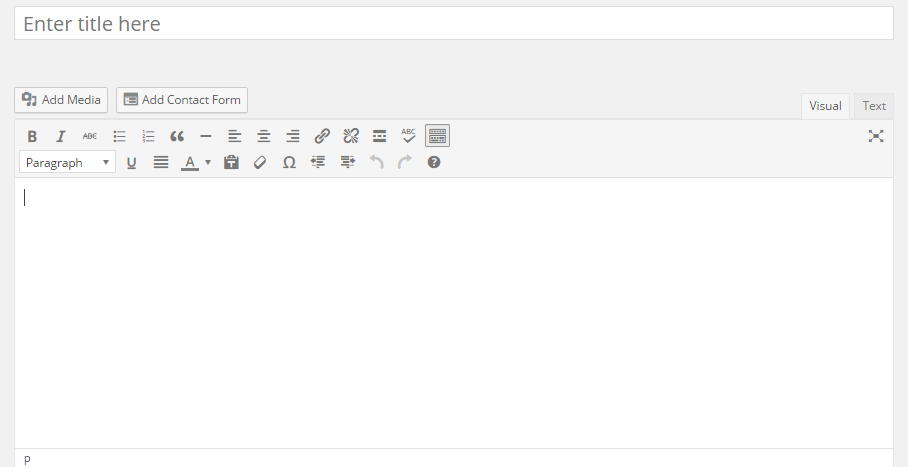
This will bring up the editor (shown below). Be sure to always give the post a title.
Editor
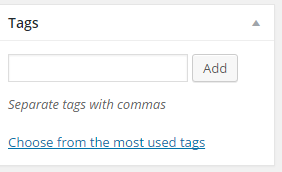
It is always a good idea to add some ‘Tags’ to your posts/pages in the box located further down on the right of the screen:
Tags
Use a tag as a keyword that sums up the topic of your content. As mentioned earlier, tags automatically enable similarly themed content items to be grouped together. You can use several tags, or just one, it’s up to you.
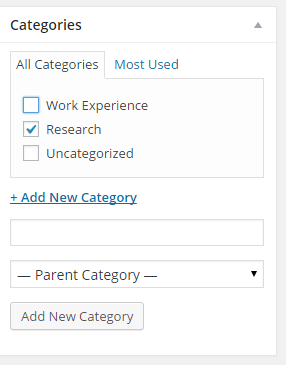
Your content can also be categorized. A category acts similar to a tag, but gives a much broader summation of the theme. It is best to limit categories to a small number. Examples may include: Research, Key Skills, Work Experience, Lesson Plans, or even a course name, etc.
Categories
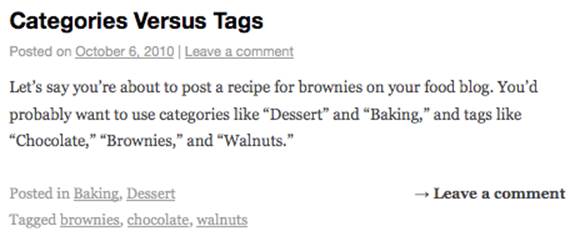
Categories vs. Tags: Tags are similar to categories, but they are generally used to describe your post/page in more detail. For example:
Categories vs. Tags*
How are the archive URLs different for tags and categories?
If you publish a post/page attached to a category “food,” the URL will look like this:
https://eportfolio.mun.ca/USERNAME/category/food/
The same post/page using the tag “food” will look like this:
https://eportfolio.mun.ca/USERNAME/tag/food/
If you publish a post/page attached to a category “food” and with the tag “rice”, the URLs will look like this:
https://eportfolio.mun.ca/USERNAME/category/food/
https://eportfolio.mun.ca/USERNAME/tag/rice/
By default, people who fill in their name/email will be able to leave a comment on your post. If it is that users first time commenting, you will receive an email with links to approve or trash the comment (if it is spam).“Discussion” features of a post can be changed under the “Settings” section. You can change the setting so no one can comment, or that you have to manually approve all comments before it is shown publicly.
When you’ve finished writing your post, you can “Save Draft” if it is not ready for public viewing, otherwise, feel free to “Publish” your post for people to see.
Publish
A further note about allowing discussion on your post
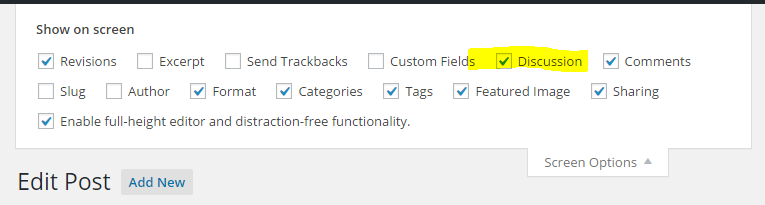
There are two places where you can override the default setting and prevent discussion on your post. The first is on the edit page for the post in the “Discussion” settings section. If this section isn’t shown on your screen, select “Screen Options” near the top right corner of the page and select “Discussion”:
Settings for discussion
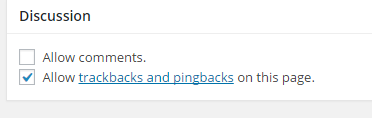
This adds the options below the main editing area:
Discussion settings
Uncheck “Allow comments”, then no discussion can occur on that post.
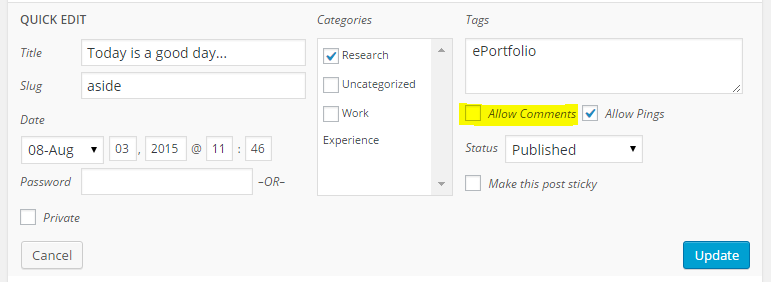
The second place you can override the setting for a specific post is from the listing of All Posts.
Hover over the post in the list then select “Quick Edit”
Over on the right side, ensure that “Allow Comments” is not selected, then select the “Update” button.
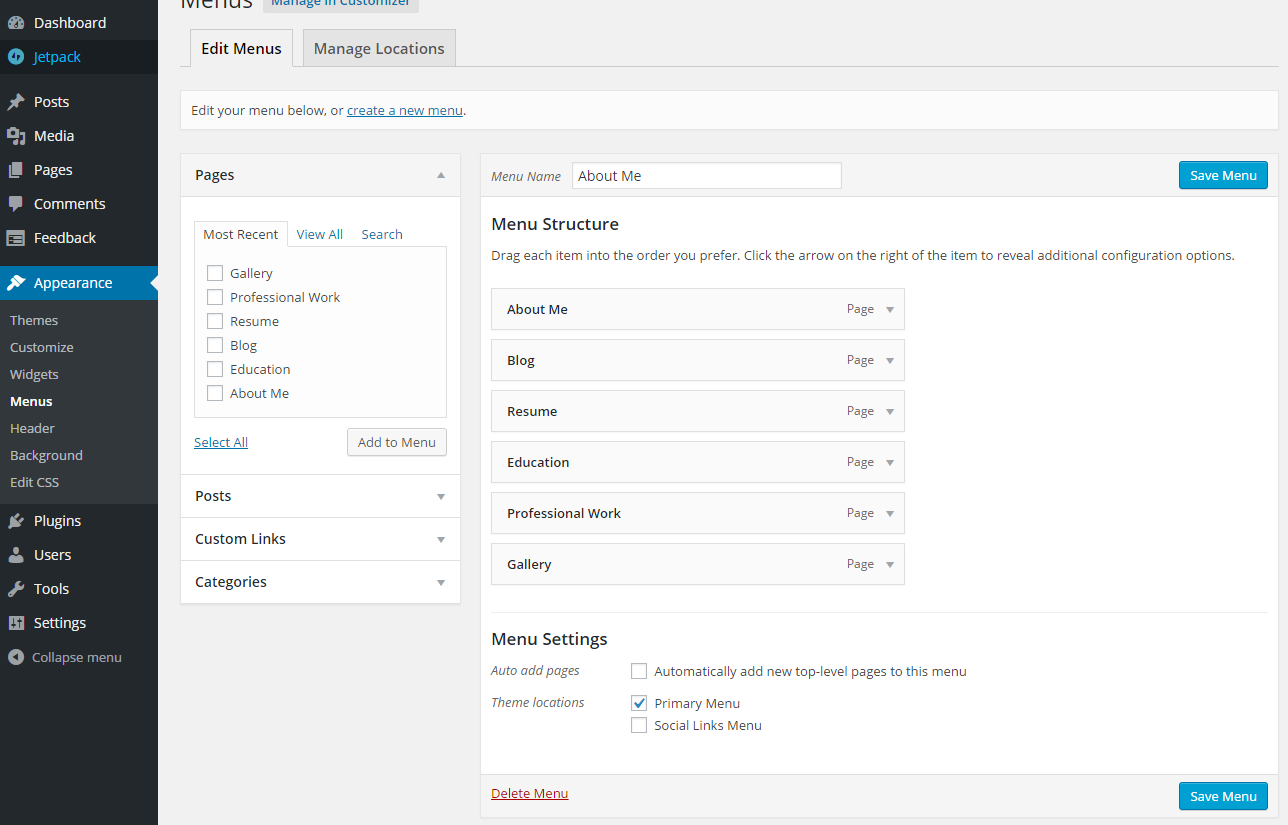
In this section we’ll show you how to setup your ePortfolio’s menu. With the default theme in use, a single menu is all that’s required. You can edit the order of how your menu is shown very intuitively using drag and drop to change the order. If you drag an item below another and indent it, it will show as a sub-menu item.
Menu editing and creation
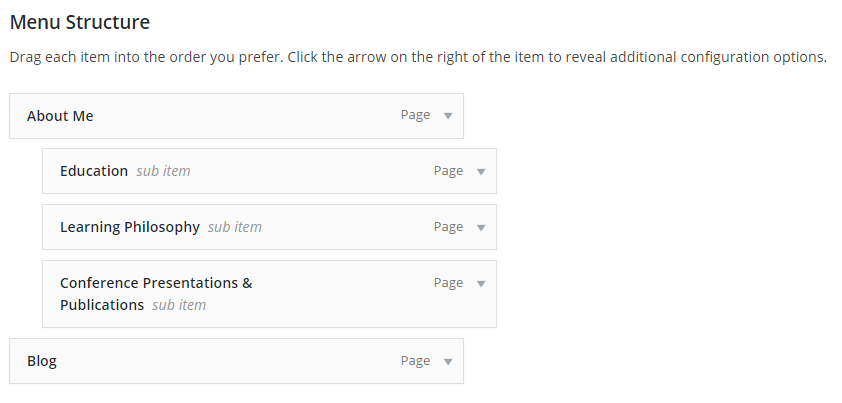
If you want to make items sub-menus of a top level menu item, such as “About Me”, you can drag the items as shown below. Notice they become labeled with “sub-menu”:
Menu structure
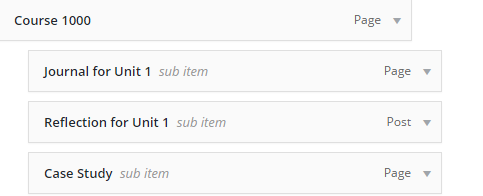
Creating a Menu for a Course
It may be required that you use your eP for a course. In order to maintain a clean structure, you can create a top level menu for your course, and add the relevant sub menu items beneath it (Note: the section on security and sharing explains how this content can be shared with specific groups such as your class, profs, TA’s, etc.).
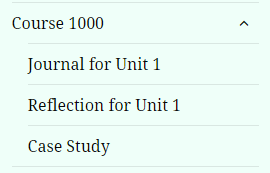
Below is the sample course called “Course 1000” which has a number of pages, and a post, added to its menu.
Create course menu
When this menu is saved, it displays on the main page, using the default WordPress theme, as follows:
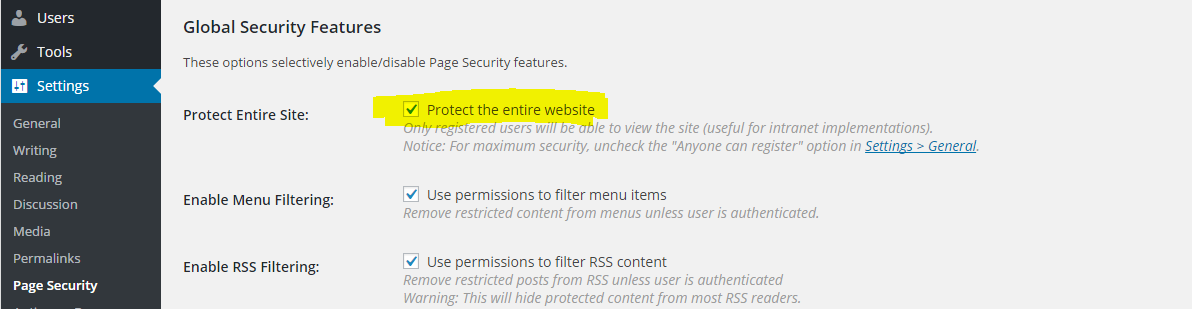
Your eP and all its pages/posts are all locked by default. As you add pages/posts NO ONE CAN VIEW THEM until you unlock the site and setup access.
The first step in sharing content is to unlock the site from Settings / Page Security. The default is shown below.
Site Security
Deselect the setting “Protect the entire website“. When deselected, all pages/posts are still individually locked by default.
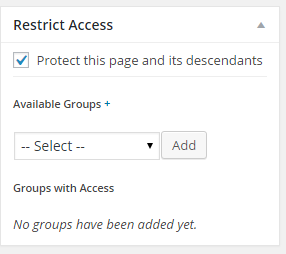
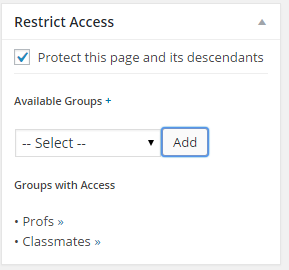
To change the security settings for a piece of content, open the page/post that you’d like to set access for. All settings are available from the Restrict Access box.
Restrict Access
Unchecking “Protect this page and its descendants” will allow anyone online to view that page/post. This is typically done for pages such as: About Me, Resume, Education, etc. When set this way, viewers will not have to login to MUN, or to WordPress, to see this content.
If the page/post needs to be viewed by specific users such as friends, classmates, a professor, or teaching assistant, the recommended way to share content is to create a group and assign it to pages/posts. You can add members to a group if they exist at MUN using their MUN username / email address (note: these users must have a my.mun.ca account).
If the page needs security, but has to be shared outside of MUN, you can make it public, and using wordpress setup the page visibility. Details on those settings are in the section “Visibility: Public / Password Protected / Private.”.
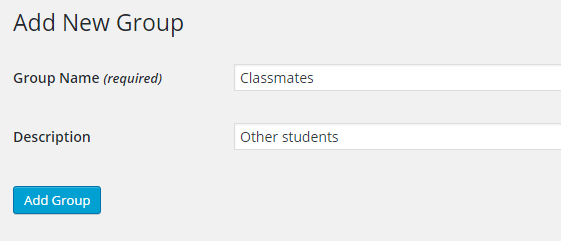
Setting up a group
From the Restrict Access box, select the + (plus) icon after the text “Available Groups“. A new page opens where you type in the group name and description then select the Add Group button.
Add Group
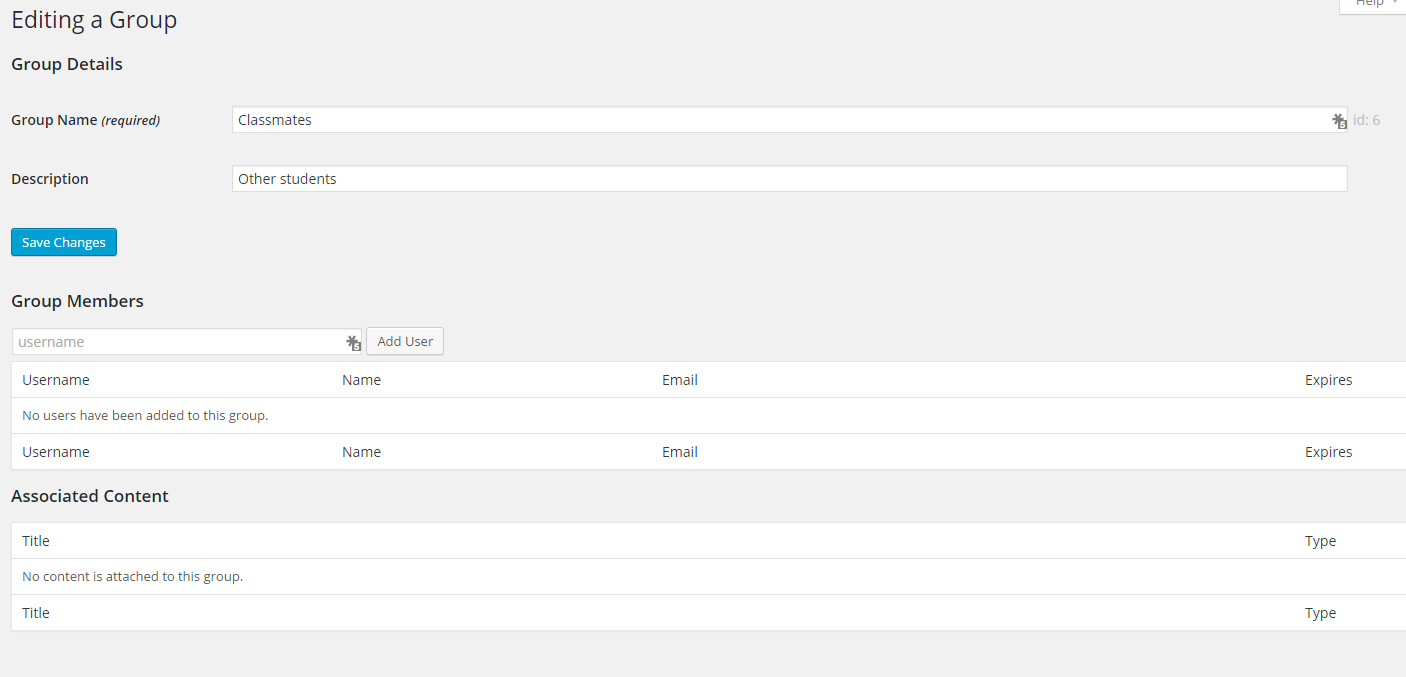
The next screen shows your list of the groups including the new one you just added. Hover over its name and select “Edit“; the below screen will show:
Setup Group
At first, the Group Members list will be empty. You add members using the username field and the “Add User” button. For adding users at MUN, you can use their MUN username/email address. As mentioned above, if the user is not at MUN, you will first need to add them as a user via Users / Add New, then you can come back here to add them to the group.
The other important step is to set what kind of access each group member will have. If you do nothing, they will default to a “Subscriber” (this is a WordPress term). This means that user can read the page/post in question.
Sometimes you may want to give a user more control such as the ability to collaborate with you on a page/post and edit your content. To do this, for a specific user, hover over the username in the Group list then select View. On the page that opens scroll down to the dropdown for “Role“. Selecting them as “Author” will allow them the ability, when logged in, to create, edit and delete both yours, or their own, Posts. Full details on the Roles available are available from WordPress.
Once you’ve finished adding users to a group, go back to the page/post you want to share and select the group from the dropdown.
Groups in dropdown list
Once added, they will show in the Restrict Access box listed under “Groups with Access“:
Who has access
Inheritance and setting the Parent Page
If you have a number of pages that you are creating, you do not have to go through this process for every page. You setup permissions for the parent page, then all descendant pages inherit its settings.
For example, a main parent page could be made for a project or (for example) for the course “XYZ 123”. Then any page can be set to have “XYZ 123” as its parent, and its security settings will be inherited. This avoids you from having to make access changes in more than one place. The setting for this is in the Page Attributes box in the Parent dropdown.
The below settings come into effect AFTER the above security settings are applied to pages/posts. It is recommended to only use these settings for changing from “Draft” to “Published. There is likely no reason to uniquely password protect content using the below controls, as the security applied via “Restrict Access” settings handles it. Adding it here would mean a viewer would have to enter a password twice.
Published / Pending Review / Draft
Publish
When you are editing a Page or Post, the “Publish” box near the top right contains settings for that page/post. The dropdown contains the options Published, Pending Review, and Draft. Using this, you can publish/un-publish, or set its status to “Draft” which means it is not viewable by others as it is not yet complete. The third setting, Pending Review, is something you likely will not use with you ePortfolio as it’s designed for use on a site where there are different authors and some can add content, but cannot publish it live.
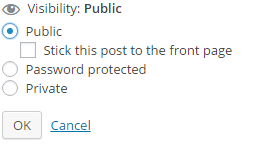
Visibility: Public / Password Protected / Private
Options to control a page/post’s visibility are also set in the Publish box under Visibility.
Select “Edit” to expand your choices to:
Public: New pages/posts, once published, are Public. That means anyone can view them. If you want the content to be restricted, you can use of the other settings below.
Password Protected: When this is selected, a password box appears. Enter in a password and select OK. This password would be given to the person you would like to to view this page. They will be prompted to enter it when they go to that content’s link.
Private: Selecting this hides the content from public viewing entirely. Only as the administrator of your sePortfolio, or those you’ve given authorization permission can see private content. All other visitors to the site will not be able to see or even know that this private content exists. You can only see your private content when you are logged into your WordPress ePortfolio.
Many types of media (often called artifacts in eP terminology) can be uploaded to your eP including documents (doc, docx, pdf), presentations (ppt), images (jpg, png, gif) and video/audio (mp3, m4a, wav, ogg, mpeg). Once uploaded, these media items can be linked to or embedded in Pages and Posts.
To upload media:
Select the “Media” link from the Dashboard.
Select “Add New”: Link button is located at the top:
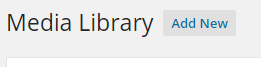
Media Library: Add new
You can then drag and drop multiples files inside of the dashed box that appears OR choose the “Select Files” option to browse to the location where the files are stored locally on your computer and the press ‘Open’. Complete the details and select ‘Save all changes’ Once uploaded the Media remains in your ‘Media Library’ and can be used as many times as you wish.
To sort and find items in the Media Library you can:
Search for the “artifact” you want to link to/embed
Filter by date using the “All dates dropdown” (filters by the month the item was added)
Filter by type: image, video, audio.
Adding Uploaded Media to a Page/Post
When you are editing content, at any time you can select the Add Media button to insert an item from the media library.
From a page or post, select the Add Media button:
A window opens showing the contents of your media library
If you select a document (pdf, doc, etc) this will create a link to that file in your content. If you select an image to insert, be sure to fill in the pertinent details for it on the right side. For example:
Attachment Details
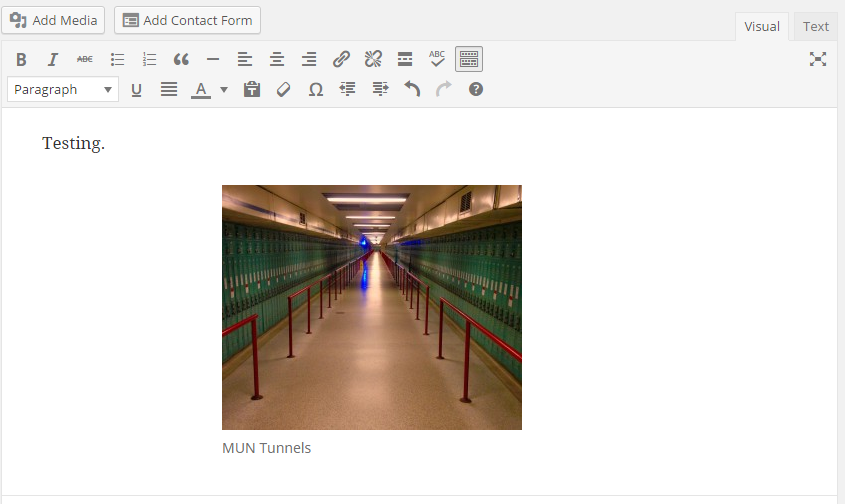
When the details are filled in, select “Insert into page”. The image will be placed in your content similarly to the below example:
Image inserted
When the page is viewed, users will be able to click on the image to view it at its full size. This is determined by the option selected in “Link to” (shown in the Attachment Details example).
If the media you are adding is an audio file such as an MP3, you can add it to the page using the Add Media button. Select and upload the file and when inserted, WordPress automatically handles the file and provides users with audio player controls:
Embedding video
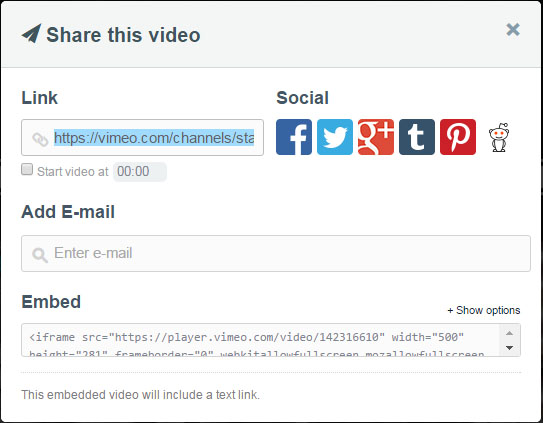
YouTube and vimeo.com videos can be embedded into any page or post with the following steps.
Copy the address of the video from your browser address bar.
From YouTube: From Vimeo, select the share button from the video:
Then select the link from the window that opens:
Paste the link address you copied directly into the WordPress page/post where you want it shown.
Save and preview the page; the video player will be available.
If you require more control over the size and display of the video, use the video embed code provided by YouTube or Vimeo. The Vimeo code is accessed as shown above in the embed textbox. To access the YouTube code, follow these steps:
From the YouTube page for video, scroll down below the video and select the option labeled share, then select Embed.
The code is everything in the text field, for example:
To insert the embed code from YouTube/Vimeo into your WordPress page/post, simply switch from Visual to Text view (the tabs in the top right of the editor), then find the place where you want the video to be located and paste in the code.
Switch back to Visual view, save and preview your content to see the video.
Using Content from Linney in your eP
Linney a learning object repository supported by Memorial University. In Linney you will find collections of digital learning objects to use or repurpose for teaching and learning.
After you’ve located the appropriate item in Linney, you will need to copy its embed code. With that copied, switch to the “text” view for your WordPress page/post, find the location where you want to insert the object from Linney and paste the code.
Example embed code for an image will look like this:
Often for a course or project, you may need to create a presentation. A presentation is simply a collection of pages, posts, and artifacts. To make a presentation, first create a new page. On that page you include a title, an optional introduction then add a list of links to the items in your eP that are required. For example:
Presentation: Course 1000 – Journal for Unit 1
– Reflection for Unit 1
– Unit 1 essay
– Presentation Slides (PDF)
– etc.
Each of the items in the list are links to the pages, posts, or artifacts that are a part of the presentation.
Note: If each of the pages and posts are added to the category “Course1000”, they can also be seen via the link: https://eportfolio.mun.ca/<USERNAME>/category/Course1000/.
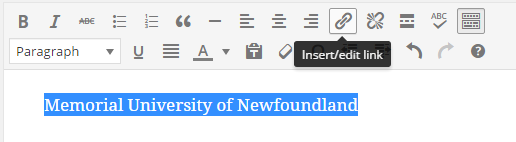
Highlight the text you would like to use for a link then select the “Insert/edit link” button in the editor toolbar:
Creating a link
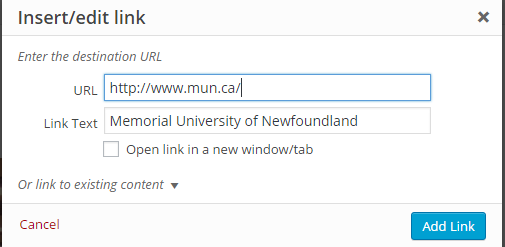
In the window that appears, enter in the URL for the link, optionally select weather you want the link to open in a new window or not, then select the “Add Link” button:
Insert/edit link
Adding links to items in your media library
When editing content, select the Add Media button.
Select the file (i.e. PDF, doc) from the list of items in the library
Select the Insert into page button. The item is now listed and linked.
Headings
Similarly to settings you may be familiar with from a word processing program, you can stylize titles with different levels of heading. This is done by highlighting the text then choosing the heading type to apply from the drop down in the editor tool bar.
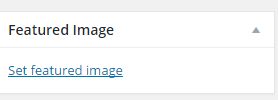
Featured Image for a Page/Post
When editing or creating a page/post, an optional setting that you may like to use is to set a “Featured Image”. The control for this is located in the lower right area of the screen:
Featured Image
To use, simply select “Set featured image” then choose an image from your media library. With the default WordPress 2015 theme, this image will then show up at the top of the page/post for which you set it above the page/post’s name.
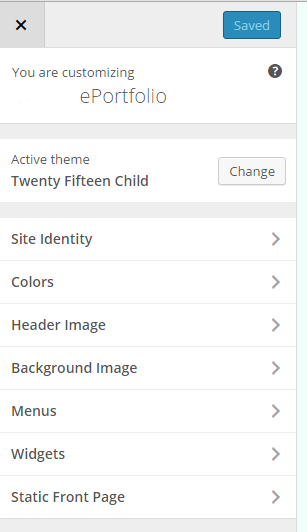
The below settings pertain to the default WordPress 2015 theme. This is the theme that is applied to all accounts.
In your Dashboard, select Appearance then “Customize”. The settings appear on the left of the screen with a preview to the right.
2015 theme settings
Feel free to select through the options to customize the theme. The sections are fairly self-explanatory and you see their effect before you save the changes. When you are happy with changes, you select the “Save & Publish” button.
Using Widgets
From the wordpress dashboard, under the Appearance section you will notice an area called “Widgets”. You can use widgets to add content to the sidebars of your site. This may include things like a contact me section, your social media icons, a twitter feed, a word tag cloud, etc.
If you are familiar with WordPress, and would like to further customize the look of your ePortfolio, we have loaded in a few different themes for you to choose from.
Use of these themes can significantly change the look of your ePortfolio and impact the functionality. We have not documented the use of these themes as they have been added with the advanced user in mind. Support for themes besides the default, is not provided.
If there are other themes or WordPress plugins that you would like to be able to use, please contact uswith your request. Each theme or plugin has to be vetted to make sure it’s safe to use and compatible.


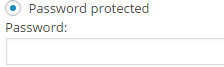 Password Protected: When this is selected, a password box appears. Enter in a password and select OK. This password would be given to the person you would like to to view this page. They will be prompted to enter it when they go to that content’s link.